


In 1550nm optical distribution networks, the ability to precisely calibrate signal levels is paramount. Whether you are balancing a long-haul fiber link or a local FTTX split, knowing how to adjust the output power of your CATV EDFA amplifier ensures that your optical receivers operate within their ideal dynamic range, preventing both signal clipping and low-CNR pixelation.
Precision Control: Why Output Adjustment Matters
The PL2000x Series CATV EDFA amplifier is engineered with high-precision pump lasers that require sophisticated management. Manually “guessing” power levels is a risk to both hardware longevity and subscriber experience. By utilizing the integrated APC (Automatic Power Control) logic, technicians can maintain a stable optical budget even when environmental temperatures fluctuate or input levels drift from the head-end transmitter.
3 Steps to Adjust Output Power of PL2000x CATV EDFA Amplifier
Before proceeding, ensure you are wearing appropriate laser safety eyewear. The invisible 1550nm radiation from a high-power catv edfa amplifier can cause permanent retinal damage in milliseconds.
Step 1: Access the Operation Setup Menu

Locate the 3.5-inch responsive touchscreen on the front panel of your PL2000H/PL2000x. Tap the “Setup” icon from the main menu. This sub-menu is the “brain” of the amplifier, allowing you to switch between different control paradigms: APC, ACC, and AGC. For standard CATV distribution, always ensure the system is ready for closed-loop power management.
Step 2: Activate APC (Automatic Power Control) Mode
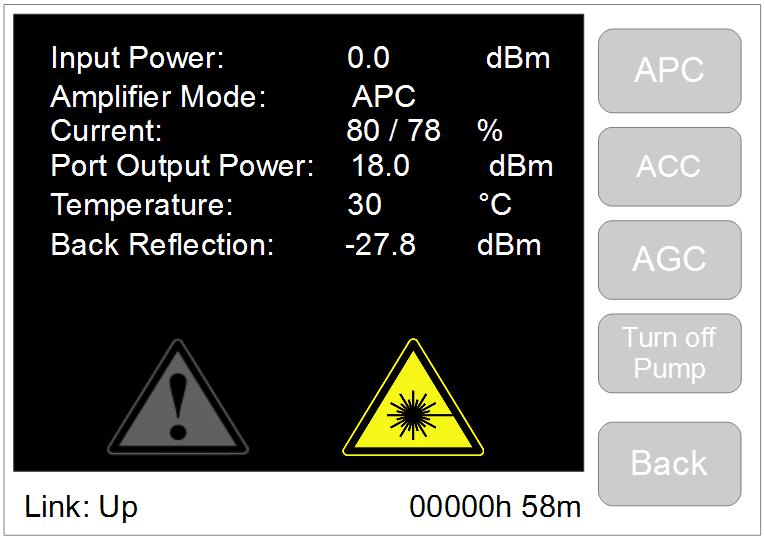
Tap the “APC” button. APC is the system’s default and most reliable control mode. In this state, the catv edfa amplifier uses internal photodiode sensors to monitor the actual output at the common port. It then automatically recalibrates the laser diode pumping current to maintain your target dBm level, regardless of whether the outside cabinet is freezing or under direct sunlight.
Step 3: Define and Save Your Optical Target
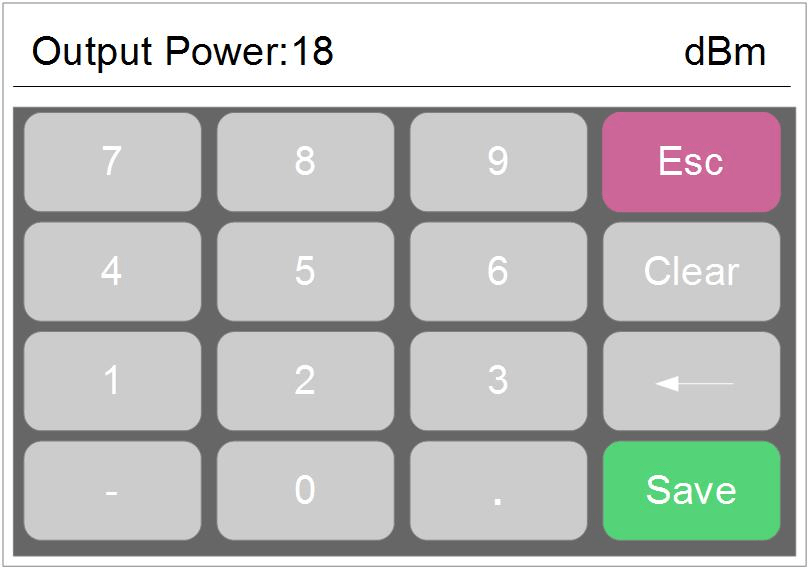
Once in APC mode, the current real-time output value will be displayed at the top of the screen. Tap the value field to bring up the digital touch keyboard. Input your desired level (for example, 18.0 dBm) and press “Save”. The amplifier will ramp the pump current up or down smoothly to hit the target. You will see the LCD update to reflect the new stabilized output power.
Technical Deep Dive: Adjustment Ranges & Limits
Every catv edfa amplifier has physical hardware limits. On the PL2000x series, the typical adjustable range is -10dB to +0.5dB relative to its factory nominal power. For a 19dBm-per-port model, this means you can safely tune between 9.0dBm and 19.5dBm. Attempting to force a value higher than the hardware’s rated capacity will trigger a safety override to prevent pump laser burnout.
FAQ on Output Power Adjustment
Q1: Will adjusting the power in APC mode affect my CNR or CSO?
A: Within the recommended -10dB range, the impact on Carrier-to-Noise Ratio (CNR) is minimal. However, dropping the power too low may increase the noise figure. Always balance your catv edfa amplifier output against the sensitivity of your furthest optical node.
Q2: Why does the power drop to ‘0’ when I disconnect the input?
A: This is a safety feature. To protect the EYDFA from internal back-reflections and to ensure eye safety for technicians, the amplifier may ramp down if no input signal is detected.
Q3: Can I change the IP address after adjusting the power?
A: Yes. Network management and optical adjustment are independent. You can follow our guide on how to change EDFA IP address to integrate the device into your SNMP monitoring system.
Final Maintenance Reminder
Always keep your optical connectors clean. A dirty SC/APC patch cord can cause a 1-2dB drop in power, which the catv edfa amplifier will try to compensate for by over-driving the pump laser, potentially shortening the device’s lifespan. Clean before you connect!
Need more technical specs? Visit our PL2000x Series Product Page or check our Laser Safety Protocols.